With the evolving technology everything has started to come in handy. This includes the customer data as well. People have been using their details more than ever. If a website asks to continue using their email, without even hesitating people just type in the information to move to the next page. How many of you would say that you would read the cookies before accepting them? Yep!! I saw that coming a mile away.
This can be good and bad as well. If the user information falls into the wrong hands, the user data can be found on the dark web. Whereas if it falls into the hands of digital marketing agencies, it can be a benefit for the customer and the agency.
I know!! Now you might be wondering, the title is Enhanced Conversions for Google Ads but I’m discussing something related to customer data. Yes! The topic we are about to discuss is related to user data.
So, without further diversions let’s get into knowing what Enhanced Conversions in Google Ads is and how it works.
About Enhanced Conversions in Google Ads
To improve the accuracy of the conversion measurement and also to unlock a better level of bidding for your client’s Google Ads, you would need Google’s Enhanced Conversions feature. This acts as a booster to the existing conversion tags by sending the first-party conversion data such as email, address, phone number, etc, in an encrypted form known as hashed data, in other terms the user data from your website is being sent in a secured way.
Enhanced Conversions uses a more secure hashing algorithm known as SHA256 (Secure Hash Algorithm 256-bit) for hiding the user data that is being sent to Google. Google identifies the hashed data using your client’s Google Ads account. This is to attribute the campaign conversions to ad events.
SHA256 (Secure Hash Algorithm 256-bit) is used for cryptographic security. In this way, the user data that is being sent is secured using irretrievable and unique hashes.
What does a PPC Agency gain out of using Enhanced Conversions in Google Ads?
The PPC agencies can get more accurate data on where the users navigate, what they do on the client’s website, and the number of conversions they make. This data has been approximated for a very long time and now with the Enhanced Conversions digital marketers can know the exact figures.
Also, know that the conversions can be accurate only if it is being tracked and attributed to the corresponding Google Ads. If you have a hard time doing it, a White Label Google Ads expert can help you with this.
Now that you know what Enhanced Conversions is and let us find out how it works
How does Enhanced Conversions in Google Ads work?

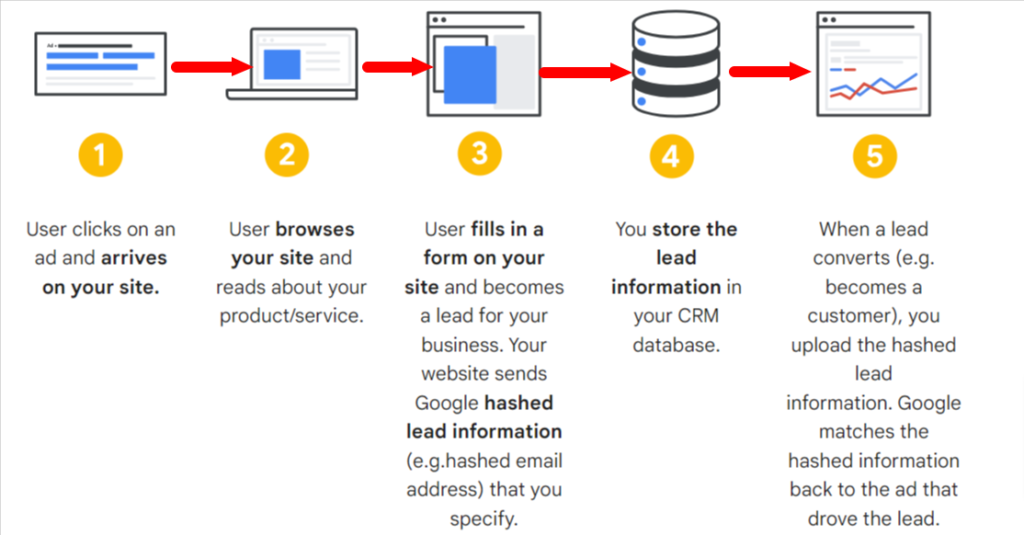
Let’s assume a customer named Natalie enters your client’s website and completes a conversion using his email address or phone number. This data is called the first-party customer data, which is captured by the conversion tracking tags and sent to Google in the hashed form and finally in the hands of Enhanced Conversions where the conversions are being measured.
But this measurement depends on what type of Enhanced Conversions you use. So, now you know that there are different types of Enhanced Conversions.
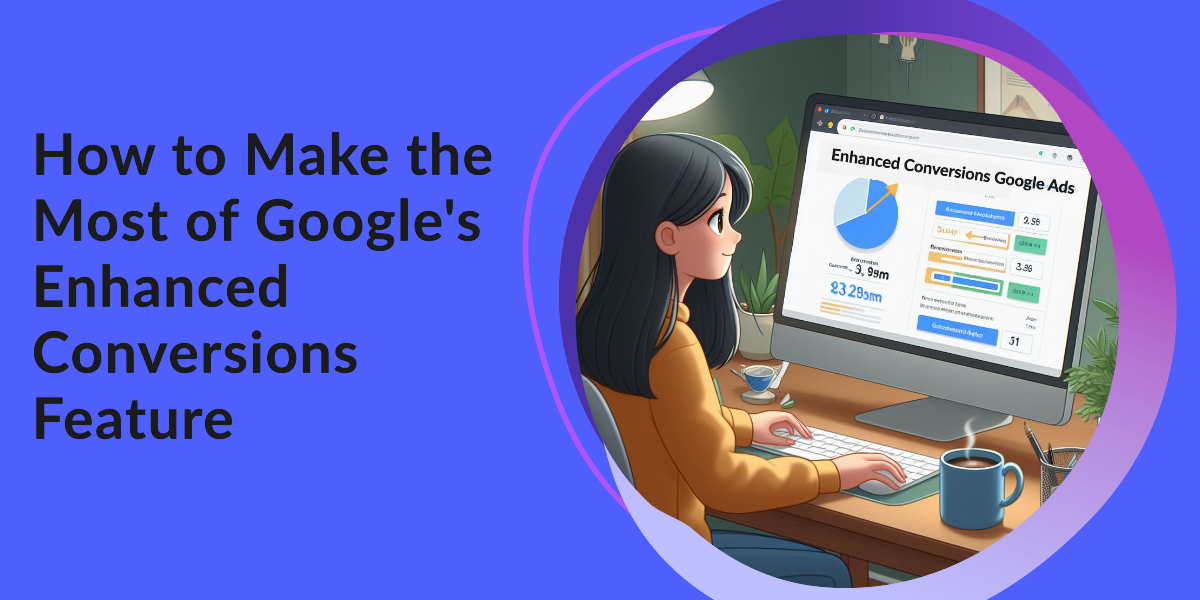
Types of Enhanced Conversions in Google Ads
There are two types of Enhanced Conversions.
- Enhanced Conversions for Web
- Enhanced Conversions for Leads
Enhanced Conversions for Web
- This can be used for clients who want to track their sales and actions on their website.
- Used to measure online conversions
- This feature would allow to send the first-party data in an encrypted format when a user makes a conversion. This data is matched using the client’s Google Ads account.
Enhanced Conversions for Leads
- This can be used for clients who want to track sales that happen off a website. For instance, if a customer converts using a phone number or WhatsApp, this feature would come in handy.
- Used to measure offline transactions that happen out of visiting a physical store or a website lead.
- This feature lets you use the hashed first-party data that is filled on lead forms by the customer on the client’s website. The hashed information in these lead forms will be used to attribute to the Google Ads campaign.
These are the differences between Enhanced Conversions for Web and Leads. Let us look a little deeper on how to set up Enhanced Conversions for Web.
Enhanced Conversions for Web
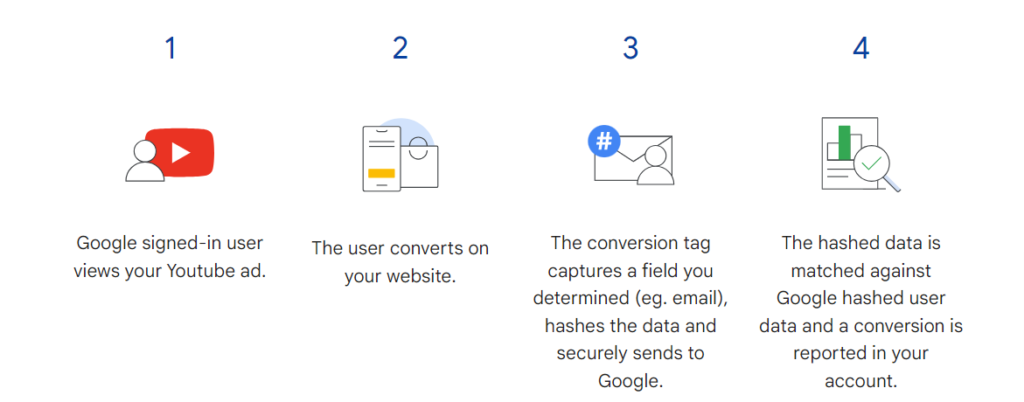
As I already said Enhanced Conversions in Google Ads uses the first-party data that is captured in the conversion tracking and is being hashed and sent to Google in the same form. Then the data is matched using the client’s Google Ads account.
As a PPC marketer, what do you benefit from it?
- Retrieve the missed-out conversions that would have been simply left behind.
- When you have more data, you can do better bidding optimization.
- Since the data is under cryptographic security, no one has to worry about privacy.
How to Set up Enhanced Conversions for Web?
There are two ways to set up Enhanced Conversions for the Web.
We will dig further into how to set up in both ways. If you wish to simplify the process of implementing the Enhanced Conversion for your client’s Google Ads or if you need additional support, feel free to get in touch with a White Label PPC agency.
Set up Enhanced Conversions for Web using Google Tag Manager
For those who are already using Google Tag Manager for tracking the conversions, this is going to take just a few steps.
Before the set-up process, you will need:
- To know the conversion page URL where the conversion tag is set up
- You should have the customer’s first-party information on the same page where the conversion tracking tag is placed.
- To implement, you will need access to the codes of your website or get hold of your developer team or get help from a White Label PPC agency.
- Make sure to review the enhanced conversion Customer data policies in Google Ads before you implement them.
Now let’s set up enhanced conversions for the web using Google Tag Manager.
Step 1: Go to your Google Ads account and click on the Goal icon on your left
Step 2: Click conversion and a drop-down list will appear. Click Settings
Step 3: Click Enhanced conversions
Step 4: Turn on Enhanced Conversions for web by marking the box.
Step 5: A compliance statement will appear. Go through the terms and click agree to acknowledge.
Step 6: From the drop-down menu select Google Tag Manager. But remember if you select a different option i.e. Google Tag or Google Ads API, the data won’t be processed.
If you are not sure which one to choose. Simply click the text next to it saying “Which method should I choose?” and a pop-up will appear. In it type in the URL of your client’s website.
Step 7: Click on Go to Tag Manager
You can set up Enhanced Conversions Setup in Google Tag Manager in three ways.
- By using Automation Collection: The tag will be the user data on the page. This is the simplest way to set up Enhanced Conversions. But you cannot say that this would give the best result.
- By Using Code: When you add a code to the website the first-party customer data that is hashed will be sent for matches. In this way, the conversion data that you receive will be more accurate. But this will only happen if you consistently send the data in an appropriate format every time your conversion tag fires. Sometimes it is not as easy as it is said, for the support you can get, contact a White Label PPC expert.
- By Manual Configuration: This is by manually specifying CSS selectors or Java script variables. But this method may look easier than automation collection yet it is not as accurate as using codes.
“It is a best practice to use the ID attribute to retrieve the value from a DOM element. IDs are unique and less likely to change over time than other properties, such as class names or names. They also aren’t affected by layout changes, which means that your code will still work even if the layout of your page changes.
If a field doesn’t already have an ID, you can add one by using the id attribute in the HTML. For example:
<input type=”text” id=”myTextField”>“ – Google
Once you have completed the setup for Enhanced Conversions for Web using Google Tag Manager, you can validate the implementations if you have selected everything correctly.
How to set up Enhanced Conversions for the web using the Google tag?
Step 1: Open your Google Ads account and click on the Goal icon on your left.
Step 2: Click conversion and a drop-down list will appear. Click Settings
Step 3: Click Enhanced conversions
Step 4: Turn on Enhanced Conversions for the web by marking the box.
Step 5: A compliance statement will appear. Go through the terms and click agree to acknowledge.
Step 6: from the drop-down list select “Google Tag”
Then continue with the same steps mentioned above in “the setting up of Enhanced Conversions in Google Tag Manager.”
How to add a code snippet to your client’s website?
Once you have set up the Enhanced Conversions using Google tag as your data source, it is important to add a code snippet. This image is an example of the before and after using a code snippet.
This is the code snippet you need to use on the client’s website. Get help from the developer team or a PPC experts team to include this or you can do it on your own but make sure not to mess up with anything else on that page.
“{‘allow_enhanced_conversions’: true}” add this to the config line to your Google tag that fires across all pages of the website.
gtag(‘config’, ‘TAG_ID’, { ‘ allow_enhanced_conversions’:true } ) ;
“Before: Example of the Google tag (currently in-place):
<!– Google tag (gtag.js) – Google Ads: 123456 –>
<script async src=”https://www.googletagmanager.com/gtag/js?id=TAG_ID”></script>
<script>
window.dataLayer = window.dataLayer || [];
function gtag(){dataLayer.push(arguments);}
gtag(‘js’, new Date());
gtag(‘config’, ‘TAG_ID’);
</script>
After:
<!– Google tag (gtag.js) – Google Ads: 123456 –>
<script async src=”https://www.googletagmanager.com/gtag/js?id=TAG_ID”></script>
<script>
window.dataLayer = window.dataLayer || [];
function gtag(){dataLayer.push(arguments);}
gtag(‘js’, new Date());
gtag(‘config’,’TAG_ID’, {‘allow_enhanced_conversions’:true});
</script>
Now you know how to set up Enhanced Conversions for the Web using Google Tag Manager and Google Tag.
Google’s Enhanced Conversions for Leads
The Enhanced Conversions for Leads is for those clients who want to track their offline conversions. The first-party data for this can be obtained from the lead forms submitted by the customers on the client’s website. Using this data the conversions will be measured.
What are the benefits of Enhanced Conversions for Leads?
- As it acquires all the details from the client’s Google Ads account, it takes just a few clicks to set up.
- Since these clients require offline conversion data, optimize it accordingly.
- This can be implemented using both Google Ads Tag and Google Tag Manager.
How to set up Enhanced Conversions for Leads with Google Tag Manager?
Make sure you have these before setting up the Enhanced Conversions.
- From your client’s website lead form, detect the field that gives a lead.
- The lead form should hold any of these two i.e., an Email address or a phone number (optional) to configure Enhanced Conversion for Leads.
- Note down the URL where the lead form is placed on the client’s website.
- Make sure to check the auto-tag is enabled in their Google Ads.
Step-by-step instructions for setting up offline conversion imports for Enhanced Conversions
Step 1: Configure the Google Tag setting
This is a mandatory step for using the Enhanced Conversions feature.
- Open Google Ads account > Tools > Google Tag
- Go to Google Tag Setting
- Select Manage automatic event detection
- Under “Form Interactions” select automatic collection.
- Close.
Step 2: Setting up Enhanced Conversion for Google Ads
- Open your Google Ads account and click on the Goal icon on your left.
- Click conversion and a drop-down list will appear
- Select Summary
- Click New Conversion action
- Select Import under Start tracking conversions
- Below that choose “CRMs, files or other data sources” and select track conversions from clicks
- The page would extend with the data source option, click connect to a new data source.
This allows you to choose a data source. But if you are choosing third-party integration by Zapier to connect, you will need to authorize it first from your end.
- Continue to proceed
- Click on save and continue to the next page> Done
Step 3: Agree to Customer data terms
Once the Enhanced Conversions are turned on, a pop-up will appear with the Customer data terms. View the terms and click agree to proceed.
Step 4: Enhanced Conversions for leads in Tag Manager Configuration
To configure you will have to set up a conversion linker tag and then specify a particular data source from the list.
Step 5: Review and Publish
Once you have set up everything, make sure to view it in the preview mode.
How do you set up Enhanced Conversions for Leads with Google Tag?
This is similar to setting up Enhanced Conversions with Google Tag Manager. Follow the same steps. The only difference is while configuring, select Google Tag Configuration.
Enhanced Conversions Leads for Lead Form Ads
- This will allow Digital Marketers to measure offline conversions up to 63 days.
- You can directly import events from Google Ads
- With accurate reports, you will be able to know everything a click can do.
- Identify the difference between a click and a query and which one gives you more leads.
- Smart bidding optimization
Now let’s see how to set up Enhanced Conversions Leads for Lead Form Ads.
- Open your client’s Google Ads account > Goals
- Select Conversion from the drop-down list > Setting
- Turn on the Enhanced Conversion for leads
- Select the method to set up and manage the user data
- Save to proceed.
Coming to an end, the Enhanced Conversions in Google Ads can help you pinpoint where the leads are generating from and give you accurate figures. This might be a bit tricky yet if you set it up in the right way, you will start to see better results after 30 days of implementing it. In case you are finding it difficult, we the most trusted White Label PPC agency is always ready to give you a hand.